This is not whogohost review: I would be doing a whogohost tutorial right here on this post and show you exactly how to make or create a website with whogohost hosting.
For this tutorial we are going to create a wordpress website or blog easily and fast using whogohost hosting.
But just before then you may want to know;
- What Whogohost is all about?
- Founder
- Is the Hosting good enought?
- Is whogohost domain registrar worth it?
About Whogohost
How to Create your Website with Whogohost
Years Back when I started online, I had no Idea of creating a website or blog. Thanks to Google and some friends who helped me on the way in purchasing my first hosting and domain.
As a blog starter, you might be wondering how you can start your own WordPress blog or Website. To start a blog or a website, you need two things:
- Domain Name: Name of your website which you usually buy at the price of N1500 – N4200. Ex: google.com is the domain name.
- Web Hosting : Web hosting is where all files of your website are stored and are accessible around the globe.
Whogohost is a top reputed company to host your website and you also get one free .com.ng domain name, so it makes it easier for a newbie to start his or her own blog.
In this step by step guide, you will learn how you can buy your Web hosting and domain name in next few minutes. After that, I will also show you how to create your own blog in another few minutes. So lets start with our guide:
Step by Step tutorial to buy Hosting & Domain from Whogohost
Firstly, you are going to need an account with Whogohost so head over to or click www.whogohost.com and click on Register an Account. Fill the necessary details with your best email. Now click on Register to finish your registration. Make sure you check your email to verify your Account.
You will be taken to your Dashboard.
The next is to Click on Hosting and Domains from the Top >> Order New Hosting and Services;
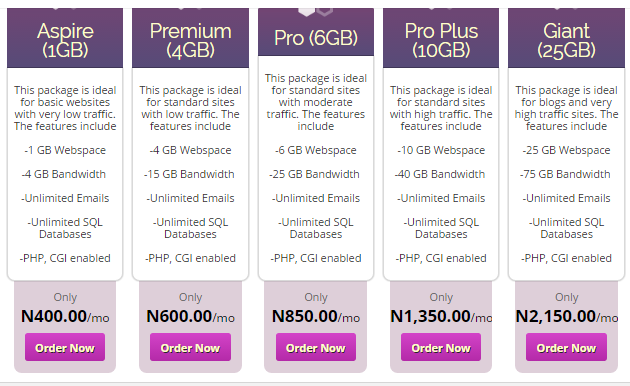
Now its time for you to chose from the hosting plan of your choice starting from aspiring to giant hosting. I would advice you go for Pro or Pro Plus. If you go for the Pro Plus , you pay N13,500 annually (per year).
Below are their Hosting Plan Prices ranging from smallest to Largest.

Now that you’ve decided on the one to go with, Simply click on Order Now as seen in the above screenshot.
From the next place you are taken to, you are to choose which domain you want to use. As stated earlier, your domain can be something like www.mydomain.com, www.google.com, www.myblog.net etc.
Now input the name you want to use and select the extension i.e. .com, .com.ng depending on your choice. The one in the screenshot below is www.yourdomainhere.com (the extension is .com.ng)
Click on Check to know if nobody has registered it already. If it returns a congratulation message, then you are good to go. But if it shows opposite then you have to try another name.
After done with the above step, click on continue.
The next step is very important. You need to choose your billing cycle which means how often you want to be paying for your domain and hosting. You should choose yearly here so that you can save funds.
Click on the drop down under billing cycle and select annually then click Continue.
The next and final step is to Pay for your hosting. Now you need to click Checkout (the green button with arrow) Use this Coupon Code WGH10SH in the space for coupon on checkout.
You will be provided with different Payment Methods. Select the one that best suits you and Complete your Payment.
Holla! You just purchased domain name and hosting from whogohost.
You can follow the below guide to install a WordPress on your Whogohost account.
Overall with Whogohost, you will be having least headache when it comes to hosting management.
Whogohost WordPress Setup: Installing WordPress
WordPress is world’s most popular blogging platform, and Whogohost is rated as top shared hosting for running WordPress blog. Starting from at least N400 per month along with one free .ng domain, Whogohost is an idle hosting choice for the majority of WordPress users.
Using this tutorial, anyone with no prior knowledge of WordPress can install WordPress, and in I will share how you can start using WordPress. If you have not yet bought Whogohost account, below is discounted link, which will also get you one free .ng domain.
Get 25% off with Free.ng Domain on Whogohost
How to Install WordPress on Whogohost
So I assume you have your Whogohost login details with you. Go to whogohost.com, click on Account Login and use your credentials to login to your Whogohost Account. Once you are inside your Dashboard, click on Cpanel.
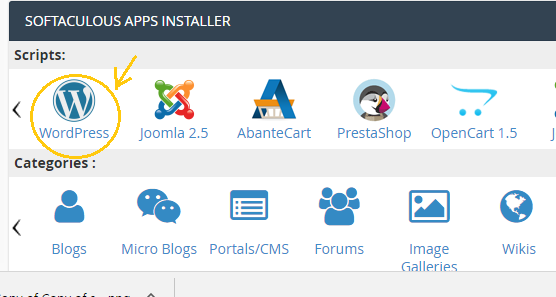
Right below Softaculous Apps Installer click WordPress as seen in the below screenshot
Click on Install WordPress.
If you have not been paying attention since, then you need to in this part.
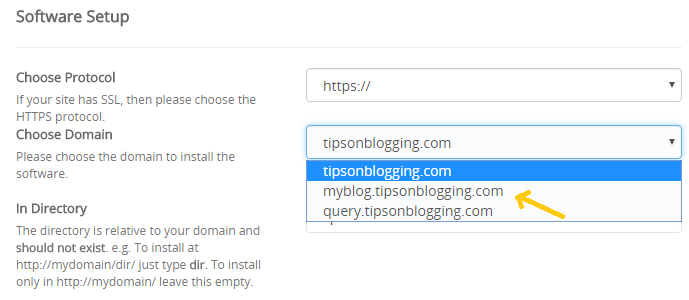
On the next page, you need to select domain where you want your WordPress blog to be installed. Here you can select few things which I will explain:
- You can install WordPress on your domain without www or with www: (Ex: domain.com, www.domain.com) : I prefer stripping off www, as this will keep my domain name short, and will make sharing easier on social sites like Twitter. Moreover, these days www in the domain name doesn’t serve any purpose.
Here are some notable changes:
- Sitename: Set the site name you want to use. For example, here at this site, I use Tipsonblogging.
- Admin Username: Keep it something other than admin. (Admin is common, and can be used for brute force attack).
- Pass: Keep a complex password.
- Admin Email address: Use your Email address
That’s it, and now select the Terms and condition box, and click on Install now.
It will take approximately 30-60 seconds for this script to install your WordPress blog, and it will be displayed on the same screen.
Once done, you will see the success message on the screen. Use the login, and login to your newly installed WordPress blog, and start making changes.
Your WordPress installation details would be sent to the email you put as well.
That’s it, and within few minutes your personal or professional WordPress blog is ready.
If you still have any question regarding the same, feel free to let me know via comments.
If you enjoyed this few minutes WordPress installation tutorial using whogohost, consider sharing it on Facebook and Google plus.
Best Whogohost Alternatives: Where To Migrate When Site is Down
“Pobody is nerfect!”
This is one of the quotes I always believed in & it would be unwise for any of us to call anything to be perfect.
The same is very true with Whogohost hosting; as at times for certain website, Whogohost hosting doesn’t work as great as it should be. It’s not surprising to see people saying their website hosted
on Whogohost is down.
As an end user, I have had this experience quite a few times, but no downtime lasted more than 10 minutes.
Though that was me, for many Whogohost downtimes was more than they could afford as a website owner. Especially a blogger or an E-commerce owner
Especially a blogger or an E-commerce owner whose whole bread & butter is dependent on their web site, I believe every second of downtime counts. If your sites hosted on Whogohost is down & looking for an alternative to it, I’m suggesting few of the web-hosting companies that you can shift.
But…
Before you decide to migrate your site, I would recommend:
If your downtime is not more than 10 minutes, you should not move. If your downtime is frequent & Whogohost customer support is unable to help you, then move immediately.
Let’s find the web-hosting company which will keep your website up at the time of current crisis.
Namecheap

Our #1 Recommended hosting for any website.
We personally use this for this blog and our clients.
Namecheap has been in existence for a while and according to customer reviews they are one of the best on the internet right now.
Namecheap is very cheap around $9.88 first year.
Bluehost
One of the oldest web hosts started in 1996, Bluehost has become the largest brand name when it comes to WordPress hosting. They are an official ‘WordPress’ recommended hosting provider. With Bluehost, you never have to worry about your website being slow even when there is a lot of traffic. Their 24/7 expert support is always there to help when you need it by phone, email, or live chat. They are rated #1 in web hosting for small businesses. They offer Free Domain and a free Site Builder with templates.
HostGator hosts over 8 million domains and is one of the most popular web hosts in the industry. With 1-click WordPress installation, 99.9% up time guarantee, and 24/7 support, it’s a smart choice for every website owner.
DreamHost has been around for 18 years, and is known for making web hosting easy. You get custom dashboard, 1-click WordPress install, automatic WordPress updates, unlimited space, unlimited bandwidth and free SSDs which makes your site 200% faster. DreamHost powers over 600,000 WordPress blogs and websites. There are no setup fees, and you also get a free domain.
InMotion hosting has been a well-known industry brand with reliable performance for business class hosting. With award winning technical support and 99.9% uptime, they are a user favorite. Their unmatched U.S. based support is always there to help. InMotion Hosting’s WordPress Hosting is optimized for active bloggers, and offers great scalability for your blog’s growth.
SiteGround is one of the most popular and highest rated hosting provider in the WordPress community. They provide unique in-house WordPress speed and security solutions to make your site as fast and secure as possible. They are known for the best 24/7 support in the industry which is why they’re an official ‘WordPress’ recommended hosting provider. SiteGround features include automatic upgrades, built-in WP caching, CDN, one-click staging and GIT version control. They are also one of the few companies offering location specific hosting with 3 data centers in USA, Europe, and Asia. On top of all this, they have а special 60% discount and a Free Domain.
Well, for now, these are the options you have as Whogohost alternative. In the coming days as I will find more solutions, will update this post.
How to map Whogohost Domain to Blogger Blog
Do you have a Blogger blog i.e. still using yoursite.blogspot.com but you want to change it to
yoursite.com?
Then you don’t have to worry because right now you are going to learn it without anyone having to do it for you. Which also means you are going to DIY (Do it yourself).
But before we start, I suppose you have already bought a domain from Whogohost
Follow the steps carefully to map whogohost domain to your Blogger Blog.
How to Map Whogohost Domain to Blogger
Step 1: Make sure you are logged in to your Blogger and Whogohost Account
Step 2: From your Blogger Dashboard, Click on Settings >> Basic
Step 3: Now Select “+ Setup a 3rd party URL for your blog” as seen below
Step 4: Input the domain name you just bought from whogohost. make sure it starts with www e.g. www.malegeek.com.ng and click save.
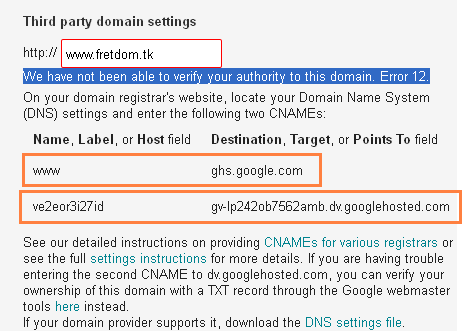
You would receive an error. This is because they are not able to verify your configuration yet.
Keep reading;
Now you would be given two codes as seen below.
Don’t have an Idea? No worries am going to teach you step-by-step.
Now from your Whogohost Dashboard, Click on Domains from the Top and Select Manage DNS
You will need to Add a New Zone
1. Click on Add Zone
2. In the field for Zone name put your domain name e.g. malegeek.com.ng
3. In the field for IP Copy/Paste this google IP 172.217.8.206
4. Click on Add Zone. your zone is now created but we are not done yet.
Keep reading below;
This time, you need to click on the Pencil edit icon next to the delete icon and you should have something similar to below
Click on Add Record (the button in blue) a box would pop up.
Now we need those error message from our blogger dashboard
follow below carefully
- In the field for Name input the second cname (not the one with ghs.google.com)
- In the field for Type, select CNAME
- In the field for RDATA Paste the Target of the second CNAME
- Click Add Record. Below is the cnames you are to put.
Now we need to Add google IPs which are four in number. Follow below
In the field for RDATA. Paste the below Google IPs. Do them one after the other by clicking on Add Records..
- 216.239.32.21
- 216.239.34.21
- 216.239.36.21
- 216.239.38.21
Make sure you select A as the Type throughout, not CNAME this time.
Finally click on Save Changes.
Now go back to your Blogger Dashboard and Click Save too. It should save successfully this time. If it doesn’t then you might have missed something. Follow it again.
This is how to map whogohost domain to Blogger Blog.
Conclusion
If you don’t want to go through the hassle of setting your own website yourself, you can hire me.
If you have any question, feel free to ask via comment. If you enjoyed this guide, do share with your friends on Facebook, Twitter & Don’t forget to buy me a coffee.
Again, this is not a whogohost review but a tutorial.
I hope this whogohost tutorial definitely helps you create your own website easily and fast.
Hello there, I’m Prosper Noah, a blogger turned full fledged data-driven digital marketer with more than 8 years in the content marketing game. My team and I will help you drive more traffic and skyrocket your sales


Thanks for an excellent guide. According to your experience, can you suggest me some good cloud hosting for my WordPress site?
Thank you for this lecture.I had a free wordpress account and upgraded to premium to enable me monitize my site. To my surprise, my site which was iacn.com.ng was now iacndotcomdotng. I change it as instructed to iacn.com.ng as primary name. Now it changed from premium to free. Whenever I login, I will see a box telling me that I have no right to the site. I paid to upgrade on the 4th of April. I want to stop it and get a refund before and then move on. Can you help please. I cannot even get to my dashboard
Whogohost Customer Service is the best among other Nigeria Webhosting Company, I tell you.
Within 24hrs.
That is good for any online business company.
Using Coupon Code is another sweet spot of making sales from an average individual.